Low Key
Low-key photography refers to dark-toned images that emphasise natural or artificial light only on specific areas in the frame to create striking contrasts, which convey atmosphere and mood. The genre is all about illumination and elimination, where shadows are a primary element of the composition.
The following is amore detailed explanation and is an Extract from https://www.lightstalking.com/low-key-photography/
A low-key image is usually dramatic and full of mystery., low key lighting creates striking contrasts through reduced lighting. Shadows are usually the primary element of the composition.
Low key photographs, often have a rather dark dramatic quality to them. The strong contrast between light and darkness emphasizes enigmatic, mystical atmosphere. One of the most famous photographers who used low key approach regularly is Yousuf Karsh
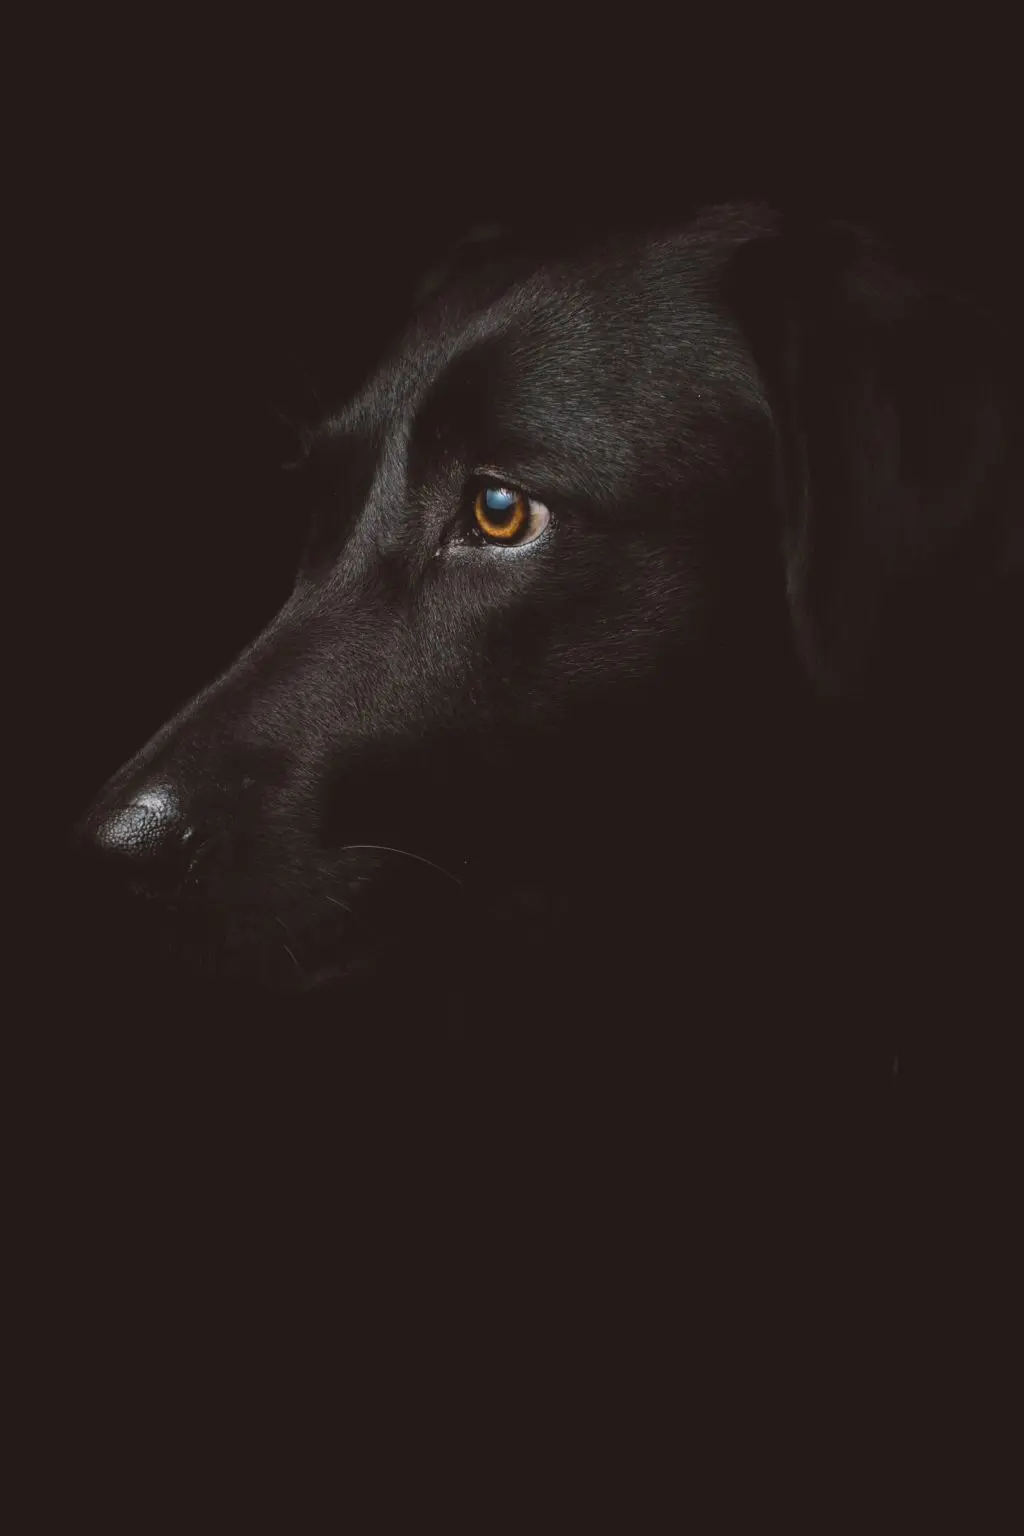
<figure size-large"="">When it comes to ideal camera settings for low key photography, you should try to keep your ISO low and aperture wide open. You can start by setting your ISO to 100 or as low as possible on your camera. This is quite important because low ISO will make your image dark and noise-free. Once you’re satisfied with your choice of ISO, you can adjust your shutter speed and aperture and achieve the desired effect for the light you've chosen.
You can set the aperture by starting with the smallest f-number, such as f/1.4 or f/1.8. This will allow you to take in the most light and adjust from there. You will be able to use a relatively fast shutter speed if you stick to the widest aperture, but you will surely have to adjust your shutter speed depending on the light source you’re working with.
You can also use an auto-exposure mode and apply negative exposure compensation when shooting low key images. If you decide on using an auto-exposure mode with exposure compensation, you should switch the camera's metering mode to spot metering. Spot metering only uses a small area to calculate the exposure which means the camera won't take the dark background into account when calculating the exposure, but only your subject – that’s exactly what you’re looking for.
<h2 editor-rich-text__editable"="" id="h-lighting">Lighting
Using low key lighting is ideal for dramatic portraits. It can add a certain depth and mystery to the subject and composition. Dark shadows and strong contrast can easily alter the mood of the entire scene and make it more alluring.
A choice of light and its strength and direction is up to the photographer. The only rule you should follow when shooting low key is to never allow light to reach your background. In addition to that, most photographers also try to avoid casting dark shadows on the faces of their subjects. Even though low key portraiture is dramatic, it should be flattering for your subject.
<h2 editor-rich-text__editable"="" id="h-keeping-the-background-dark">Keeping The Background Dark
No matter what lighting pattern you choose to experiment with, you should make sure that the background is dark enough. In case your background seems light and distracting, you should move the model and the light evenly away from the wall. If you do that, you’ll notice the light on the model stays the same, but the background gets darker – and that’s exactly what you need!
Another way to make the background darker is by moving the light to the side. In this scenario, the background will darken even more and your portrait will look more dramatic, which is great if you’re looking to achieve something really bold.
In case you have a grid in your studio, you can control the light even more by using this handy light modifier. The grid restricts the light to whatever is in front of the light only, which means the light won’t spill on the background.
Even if you don't have a studio, you can still shoot amazing low key images. A popular way to do this is to use two separate rooms. Block off all light in one room so that if the door is closed, you could see nothing. Use the adjoining room as the light source. You can use the door to help control the incoming light. Try to keep the light from hitting the camera or the background!
<h2 editor-rich-text__editable"="" id="h-using-torches-or-candles">Using Torches Or Candles
Another great (and affordable!) way to use low key lighting is by experimenting with candles or torches. This type of lighting can be ideal if you want to elicit a gothic or romantic feel. Both candles and torches are easy to use and definitely cheap.
In order to make your candlelight photography truly great, you should use a tripod and make sure to spread your candles evenly. Using a single candle or positioning multiple candles closely together will result in harsh shadows! While this may be what you’re looking for, in most cases you’ll want an evenly spread light.
<h2 editor-rich-text__editable"="" id="h-low-key-outdoor-photography">Low Key Outdoor Photography
What’s really great about low key photography is the fact that you can create low-key images any time of day. You can do it in the midday sun if you are indoors or outdoors on a dull, overcast day – you don’t have to wait for dusk! For instance, an overcast day and an industrial, urban scene provide a perfect backdrop for capturing something dark and ominous.
Low key landscapes are maybe not as popular as low key portraiture, but you should give them a try especially if you enjoy unusual landscape photography. Make sure to capture clouds – they make the sky less bright, but they also create dynamic light patterns on the ground.
You will need a tripod in case you decide to shoot low key landscapes since you probably won’t use the widest aperture for landscapes (you need a deeper depth of field!) and your shutter speed won’t be really fast. Low key landscapes often look really stunning when converted to b&w, so make sure to explore various b&w options while post-processing these images, such as color filters in b&w photography.
In addition to low key landscapes, you can also shoot wildlife in low key. Such photographs are quite uncommon, but they can look very elegant and painterly, almost as if they were shot it a studio. A low key approach to wildlife and bird photography gives a totally different perspective and it works wonderfully for animals with lightly colored fur or feathers. Using reflections can make such images even more magical – for instance, you can try to photograph a swan pond in low key.
In case you want to shoot low key images of wildlife at night, all you need is your camera and one light source that will create directional light. Depending on your location, this directional light can be produced via flash or with a hand-held spotlight from a nearby vehicle.
<h2 editor-rich-text__editable"="" id="h-low-key-macro-photography">Low Key Macro Photography
Macro photography is another genre of photography that can look stunning in low key. With a simple set-up consisting of just a camera attached to a tripod with a single flashgun, you can create gorgeous close-ups which resemble studio shots.
Typical subjects for low-key close-up photography tend to be small enough to be illuminated by a single flash, which is really great – you don’t have to rely on a complicated setup!
When it comes to settings, you should make sure to underexposure the image (remove all natural light!) and then use your flash to illuminate your subject. The best way to achieve this is by switching your camera to manual mode and selecting the lowest ISO and narrow aperture (such as f/18 or f/22). When it comes to shutter speed, you can use the normal speed for flash synchronization (such as 1/180 – 1/250 sec).
<h2 editor-rich-text__editable"="" id="h-low-key-product-photography">Low Key Product Photography
You have certainly seen many gorgeous product photographs with a perfectly dark background and well-lit product itself. Low key lighting is very popular in product photography because it adds a certain aura of luxury – it works really good with jewellery, watches and various gadgets such as cell phones and tablets. You can watch this video to learn more about lighting setup for low key product photography:
Low key lighting coming from the top and from the bottom of the product is a great choice and it can create a bold look – bright core of the image and dimly lit space around it! In order to achieve such look, you need to use two lights, mount them on both sides of the object and tilt them down to control the light spill-off.
Ultimately a low key image is just one that contains predominantly dark tones. There are many ways to achieve that – always feel free to experiment!
In closing, I'll add that although we are trying to capture darkness, it is the application and control of the light that makes a great low-key image. The lack of light puts all focus on what light is allowed to stay. All your lighting decisions will show in your image so although it can be fun and whimsical, this type of photography requires a good knowledge of light, shadow and tone. Precise lighting is required in order to control the very important shadow detail.
Manipulate your lighting and placement of subject until the shadows fall exactly as you want them. It's that easy. And difficult. If you want to go even further and start printing your low key photographs, then take a look at our guide to the best photo printer for the job.
Further Resources For Low Key Photography:
- Essentials To Getting Started With Low-Light And Night Photography
- Master Low Light Landscape Photography
- How To Get Low-Key Lighting And Exposure Right Every Time
- Use High Key, Low Key and Moderate Adjustments
- Mastering Low Light Portraits
- Getting Started With Low Key Portraiture